Saturday, October 12, 2013

Life In Plastic, It's Fantastic - Hardening a Foam Iron Man Costume...

So, busy week here in the treehouse!  I bit the bullet and articulated the armor.  The shoulder was a bit tricky because of all the parts involved and the degrees of freedom required.  I think I found a decent compromise, considering there's only one buckled strap per joint.


The knee has been hanging over my head, so to speak.  I tackled it by using the buckles themselves to provide the freedom.  I tried it on and there's plenty of movement, just not a lot to pull the knee back into perfect alignment.  I think I'll be able to live with that.


I bought some flexible, sandable caulk at work and smoothed the rather ugly intersection between the forearm and the wrist.  It took a few days to cure, but I took it outside and sanded the transition pretty smooth with 150 grit.  I was worried that the Styrospray wouldn't take to the caulk, but it evidently worked out OK.


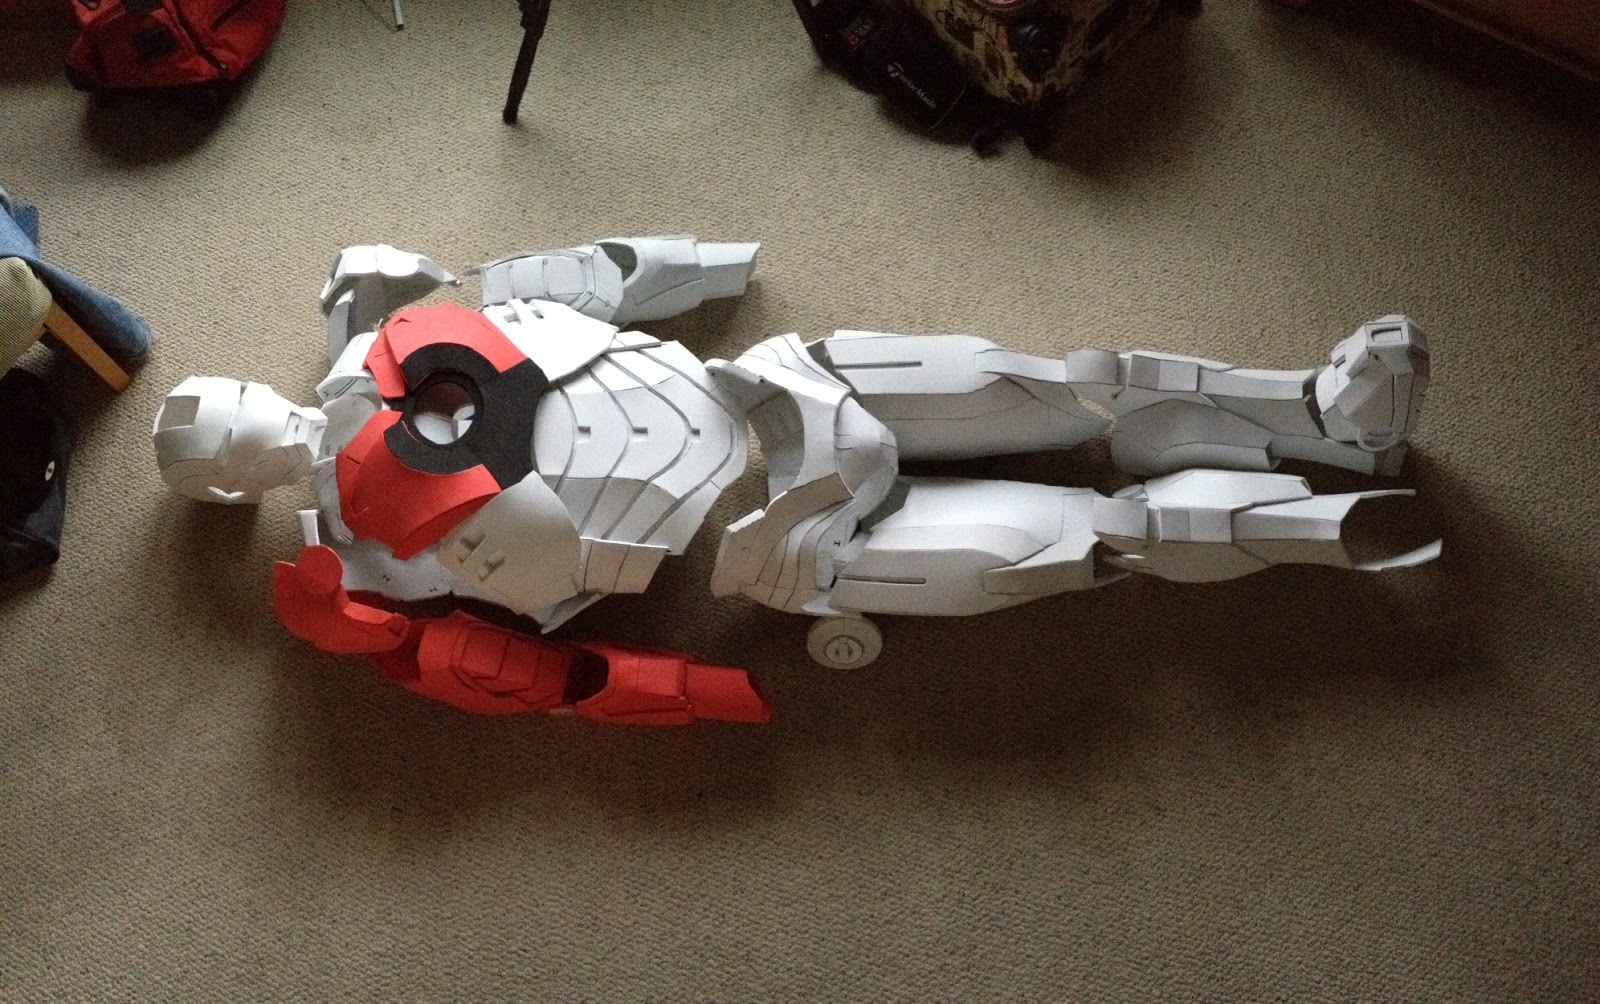
Since I've already got $300 and 300 man hours into this project, I decided to go all the way and use Styrospray 1000 to harden the foam armor.  It's a two-part polymer that cures with the moisture in the air.  Finally, living in the PNW pays off!  It's a 1:1 mix ratio, so even I can do it.  The fumes weren't too bad, kind of like freshly painted walls.  I've got two coats on about 40% of the armor and it makes a HUGE difference!  I'll do a sanding and then apply a third coat.  So far, I've used about 20% of my kit, so I should have some left over after I do three coats on the whole suit.  I can definitely see another costume in the very near future, once I recover from this one.


The Styrospray over the BoatLife Life Caulk actually looks like welded metal!


For some weird reason, the Styrospray on the red foam parts bubbled up a lot more than the white foam parts.  Sigh...  Of course the tradeoff is that it's much easier to see where you've already painted the off-white Styrospray on the red parts than the white.  Sigh...


The hardening of the armor is substantial!  The third coat should make this feel much more like toy plastic than costume flimsy plastic, if that makes any sense.  The styrospray is very glossy, in fact it still looks wet.

NOTE!  I didn't use gloves because I needed the manual dexterity to hold the parts while painting them.  Spraying would definitely be preferable.  I have basically plasticized my hands and it's extremely tough to get off.  Also, building a PVC drip drying rack is much better than letting them sit on a plastic drop cloth to cure.  Where the Styrospray contacts the plastic, you get "flash".


Based on XRobots.co.uk videos, I cast my hands in order to be able to sculpt the gloves perfectly.  Of course the $22 sculpt didn't turn out perfectly, but it will most likely be better than some sloppy foam construct.  A couple of fingers broke off in the demolding process.  I'm going to use Sculpey clay and then oven bake it to save from having to make molds.  I'll let you know how that turns out.


Here's the helmet after 2 coats.  While not DOT approved, it certainly is a lot more rigid than just the foam.  Sanding and at least one more coat, then I have to decide whether to cut the faceplate off and build the swingarm mechanism.

Captain Skully Out...

Saturday, September 28, 2013

Suit Up!

So, I spent another lovely day in the PNW listening to the whitewater gushing out of my gutters.  I love the smell of hot glue gun in the morning...;)  Here's where I'm at as of today:


I think it's starting to look pretty good...;)


I was able to connect/articulate the biceps to the back so that it can be put on like a long sleeve shirt, barely.  The thighs are also suspended from the codpiece.  They work pretty well, considering they're only attached at one point by 1" webbing.  They're all quick-release buckles, so it can be taken apart to be painted.  The problem with having a single point of articulation is that there's going to be a trade-off somewhere.  The range of motion is pretty good, given the limitations.


Decent articulation...


I also installed the speaker mounting bracket inside the chest and I will also build an iPhone pocket in there.  Plenty of room.  Note to self:  do more pushups!

The shoulder bells will be installed next.  I figured out away to hang them so that they overlap and flop correctly.  I'm going to create a slot in the back piece for the webbing to come through.  That way, the webbing can be anchored with hot glue on the inside and the shoulder bell will cover the slot.


Now that's a selfie!


The shoulder bells really make the whole costume.  I can't wait to get them installed.  The shins are going to be problematic.  I don't know how to articulate the knee.  It's the most problematic joint in nature for a reason.  It has to be strong and flexible.  I hope to get the shoulders done tonight.  Wish me luck!

Captain Skully out...

Friday, September 27, 2013

Iron Man II

So, I setup several inspirational reminders on my phone, and the 1 month until ComiCon went off last week!  I'm still really struggling between PlastiDip and StyroSpray finishes.  I only have one shot and I want to do this right.  If I use something that's truly hard, I'll be able to sand and fair the seam lines into a much better contour.


Two heads are better than one...


I dove back into the helmet pattern.  The first thing they tell you on the forum is don't make the helmet first.  Your foamy skills will drastically improve while you build the rest of the suit.  But did I listen?  They were right.  I'm happy to say it because it's incontrovertible proof as to how much you improve.  As you can see the second helmet is much less torqued and also happens to fit with enough room for the faceplate lifting mechanism (stay tuned).  Ironically, you have to glue the whole thing together first so that all the parts are supported and are the correct shape while you apply your stiffener of choice, then you have to cut the faceplate away so that it's rigid and fits the helmet perfectly.  Note, I also used contrasting foam colors for dramatic effect...;)  The original helmet was done using the heat gun/form it over your knee technique that some members on the forum are able to so quite successfully.  I, however, am not.  I liked the lack of seams, but didn't like the randomness of the curve.  I guess I was a phrenologist in a former life...;)


After an acceptable level of success with the helmet, I tackled the mind bending glove pattern (see below).  Titled "easy" version on the forum, I was emboldened to give it a shot.  HA!  The pattern only looks like a glove after it's completely assembled.  Along the way, it's a 3D Rorschach test.  I used thin foam to build the practice glove (2mm?) and had to use all of the pics of the finished glove on the forum to put it together like so.


TA DAAA!  Ugh...

As I said, you can only see how it's supposed to look after it's all put together, so I had to glue the parts where I thought they should go.  I was close.  As you can see, I made several notes on the glove about where things really ought to go.  I've also got a better idea as to where I should use the 6mm foam to beef things up and for the 12V LED repulsor housing.  It's nice to work in a marine store...;)  


Easy Peasy...

I'm going to blow up the pattern by 5% and give it another go.  Some folks use Velcro and some use rare earth magnets to hold the gloves together.  It may be dependent on whether they leave their gloves foamy soft or harden them.


 I've also made a few boots, some out of card stock paper and at least one foam version.  I'm trying to find the right size to fit over some cheap Crocs ripoff shoes at the local discount store so I can permanently glue the boots to the shoes and hope to be able to have some semblance of mobility.  I find it rather funny that when I'm goofing around and do my "Iron Man" walk it's actually a "RoboCop" walk.  I guess I'll have to work on my strutting.  Once again, even at this stage in the game, the second boot came out better than the first one...


Das Boot!

So now I'm down to some of the gory details.  I've got to get the gloves ironed out, then all the damn finger pieces.  BTW, one of the tutorials suggests you hot glue gun the parts to a glove while you're wearing it and warns that it's going to be hot!  Actually, that is the best way to get everything to fit correctly.  Sigh...  Luckily, as a rigger, I'm pretty immune to hot stuff...:-\  Don't try this at home, kids!


My favorite hyperbolic paraboloid...;)

So, last summer, and planning ahead as always, I saw that Pringles was giving away MP3 speakers that fit into the empty can if you sent in an obscene amount of Proofs of Purchase.  Loving Pringles and thinking it would be a great gadget for the Iron Man costume, I plowed through several cans, which I think made my suit a bit tighter.  Finally it came in the mail, and like Ralphie in Christmas Story, I raced into the house to open it up.  Low and behold, it was even Iron Man red!  How's that for a sign?  Anyway, it's pretty cool cranking out a certain Black Sabbath tune from inside the chest piece!!!  These are the kind of touches I'm hoping will help me win some contest ca$h...;)


Strap on!

Oh, I forgot that I'm also assembling all of the parts to make the suit wearable, keeping in mind that some articulation will be required for me to freely move about the cabin.  Here's a shot from inside the chest/abs assembly of how I positively locate the two parts so there are no gaps, the parts don't interfere with each other and the two pieces can move independently.  Hot gluing 1" webbing and making it easy to disassemble with Delrin clips.

Today, I'm hanging the legs off the codpiece, which is permanently attached to the abs.  Any articulation between those two pieces is problematic because the edges interfere, so I locked them in place, which surprisingly doesn't limit my movement because there's so much room between the codpiece and the thighs.  NOTE:  When shimmying into your costume in your skivvies, make sure to lower the blinds so your neighbors don't think you're a freak!


Friday, September 13, 2013

Port Townsend Wooden Boat Festival!

This year's logo from poster on ferry.  Have to get a t-shirt!


So, I've been planning on going to the Port Townsend Wooden since I left PT last year...;)  As a sailor and a woodworker, it's Disneyland for me.  It also happens to fall very close to my birthday every year, which is kind of cool.  An added bonus is my newfound passion for building a wooden boat.  As you know, I've been looking seriously into building CLC's Eastport Pram and they're an exhibitor every year!  Being able to see one built in real life with the new eyes I have from doing all of my research proved invaluable.

Why I go every year...

After drooling my way through the awesome chandlery at the entrance to the festival, I slowly made my way past Brion Toss' rig shop and other holy ground to the CLC "booth".  I say booth in the loosest terms possible.  They own a whole corner of the grounds.  Their boats and kayaks are everywhere.  The brightwork is dazzling.  Anyway, right there was the Eastport Pram, nesting version with sail kit, all setup, along with the Passagemaker take apart dinghy!

What all the fuss is about...;)


Seeing both together, I vacillated between them.  Then a couple of things clicked.  I could build the small one for practice to get better at the techniques so the large one would turn out better.  I could build the small one and sell it to pay for the materials to build the large one.  I think the most compelling argument as a novice boat builder is that the small one doesn't require a scarf joint, meaning I can make it out of one sheet of plywood.  It's easier to move with my back acting up, and because there's no scarf joint, I could theoretically not have to paint it and leave it bright...;)  Also, the large one would probably cost three times the price to build of the small one, which is a factor right now for this particular hobby.

Passagemaker in back, stern of Eastport Pram in front...

Upon further inspection of the nesting version of the Eastport Pram, I had a couple of observations...  First, there are a lot of aesthetic tradeoffs to make this thing nest.  The stern thwart that you see in the photo above must be removed in order for the bow to fit, hence the knobs (the line from the boom is tied to one).  I had planned on making that removable if I don't make it a sealed buoyancy tank.  Second, the "curvilicoius" center thwart isn't "curvilicious" on the nesting version because the curves don't fit when nested.  Sigh...  So now I'm torn between building the nesting version for ease of transport or making the much prettier one-piece version (see photo from previous post).  At approximately 75 pounds, maybe I can swing it (literally).

I talked with one of the guys working the booth, and the cost of the plans at the show was $9 less than online, without the additional $9 shipping.  I decided to hold off on buying plans until I metabolized my conundrum.  I then thought about building one of the cheaper or free boats from www.Bateau.com, but they don't have the same lines.  I don't want something that looks like a couple of plywood planks epoxied together, I want something graceful, so I think I'll wait until the Lummi Island dry-dock season is over and start bringing some 4' x 8' sheets of 1/4" oak plywood home.  My landlady is a totally cool lady from Alaska with tons of boating experience, so she's offered me a place to setup shop to build.

Happy as a clam in a pram...;)

I will say that an 8 foot boat for a 6' 2", 200#  guy is a bit of a stretch, but I think it's doable for a daysail.  I've also done some research on trolling motors.  Evidently, the only real difference between a fresh water and salt water versions is about $200 and some metallurgy that can be addressed by hosing the motor off when you get back.  I am very serious about the possibility of building two prams or at least using the parts for the first one as templates for another one to save lofting again in the future.  One option is Tyvek templates, but I don't want to risk the flexibility factor.  I also don't need to haul around another 75 pounds worth of templates for the foreseeable future.  Sigh...   All of these mutually exclusive criteria...  The good news is that I found some adjustable bars for my pickup that would allow me to stow the pram upside down over my bed/cab (much like those cargo photon torpedo capsules you see on top of Subarus), and they're only $50!

I've looked at building an Optimist or a Pelican, but those boats require you to build a jig, which the boat is then build onto, then when done, you cut your boat free from the jig.  While this is attractive in a classic boat building sort of way, I'd rather spend my time building the boat than the jig, and possible two boats in succession to have a fleet to race against...;)  CLC's stitch and glue method means that once the boat parts are cut out (or delivered if you order the kit), then the boat basically gets stitched together in one day, with the bulk of the work epoxying what you've put together.  I'm banking on building two is only 50% more hassle than building one, but I'll be happy with one for now.

Keep in mind that one of the goals of this project is to put together an event where people build these at home and then we all hit the lake together for a big BBQ.  The only way I can pull this off with any kind of credibility is if I've already built one to show off.  I think it makes a great centerpiece...;)


Thursday, August 29, 2013

The Iron Man Cometh!

So last year I was dating a girl who got her 2nd DUI, so she had to stop drinking, which pretty much made me have to stop drinking (Pulp Fiction, anyone?).  Anyway, I found myself with a surprising amount of energy in the evenings and I wanted to do another epic costume (first one was a complete Jack Sparrow, including overcoat and goatee extensions).  One night a couple of years ago, my buddy and I were staying up late watching how-to videos on Youtube and we came across a guy who made an Iron Man costume out of craft foam.  Completely blown away by this, I did some research.  By September, it was time to start thinking about getting started on a costume, so I delved into an Iron Man MKIV.  For the Iron Man freaks out there, there's a whole world of difference between the different models, kinda like a Mustang or Camaro from the 60's vs. the 70's.  

Anyway, I downloaded the pepakura software and then grabbed all of the files from the various contributors at TheRPF.com and cleaned out both Michael's and Joann Fabric of 6mm craft foam (1/4" for those who aren't up to speed on the metric system).  Armed with a razor knife (break off tip style), a hot glue gun, a Sharpie, cutting mat and some patterns printed out after scaling them to my size (the designer was 5'6" and I'm 6'2", so the software lets you scale things so you don't look like you threw your armor in the dryer for too long).

Starting to look like a dead body...

Right arm finished with hinge installed...

Well, Halloween came and went and I didn't finish it.  I kept working on it diligently until the mess in the living room became too much for the ex (funny how I was so supportive of her stuff).  Now, a year later, after having moved on (literally), I'm back at it again.  I've refreshed my memory about where I was in the whole thing and am ready to dive back in.  Notice that this coincides rather nicely with the fact that I can't do anything outside on the boat project because of the friggin rain.  It was time to start thinking about epic costumes, and even though I'm a huge proponent of starting projects (not necessarily finishing them), I couldn't waste the hundreds of man hours and dollars already invested in the IM project.  So I dug the Hefty bags out of the storage unit that had all of the parts stuffed inside, stripped down to my briefs (sorry, no pics of that.  UGH...  I need to do some pushups), and started realizing that the numerous parts, made up of 288 individual pieces that have been hot-glued together, could be hot-glued together.  The strategy is that I'd rather have to strap on three large pieces than thirty small ones.  I also can see the quality of the seams of the joints of said parts improve as I progressed, so I'm going to get some paintable silicone and fair the seams.


Five separate pieces that will end up as one.  I think the sink drain arc reactor is a nice touch...


This assembly will probably end up hanging off of suspenders...


May not end up being all one piece, but you get the idea...


The brace and the back will definitely be glued together.  The spine will be glued at some point and probably velcroed the rest of the way...

After that, I'm going to use Styrospray 1000 from some friends in Houston to turn my mushy foam into stiff plastic armor.  I don't want to trash this thing wearing it one night.  I've got a lot of costume contests to win to make up for what I've already dumped in to this project.  I'm not Tony Stark for goodness sake!  One of the guys that does a tutorial on Youtube tried break dancing in his IM costume and the operative word there was definitely "break".

I probably need to mention that besides blowing some minds at work (my boss is a comic freak) and on Halloween night, I want to spend an afternoon wearing my costume down at Seattle Childrens with the kids who have cancer.  I'm always looking for karma points, and I can't think of a better way to spend an afternoon if it brightens some sick kids' day.  I'll get into my sailing circumnavigation for the Leukemia Lymphoma Society later...

Rudderly Ridiculous...

So, how the PNW (Pacific North West) became a mecca for boat building, I'll never know.  All I wanted to do was fiberglass my effing rudder this weekend and it's raining...  In August!  I managed to get a little done between downpours without electrocuting myself...


I was able to fair both sides to a decent foil shape, and make them symmetrical.  Then I mixed up some of a sailor's best friend, Marine-Tex and filled the voids in the cheap-@$$ plywood I bought.


Tomorrow, I'll see if I can catch a break and do some touch up sanding, then epoxy a layer of fiberglass on at least one side with some West Systems I've been hauling around...

~~(\_~~

For a moment the other night, I thought I was going to upgrade and buy the plans for the take-apart Passagemaker dinghy that CLC sells at the Port Townsend Wooden Boat Festival, because I really like the look of the rig with the jib.  It screams "PIRATE" at me, which is what this is really about after all...;)  Anyway, I came to my senses because I thought that a boat that's 50% longer will be at least 2X the expense to build, rig, etc.  So my plan is to build the Eastport pram and then see if I can sell it for what building a Passagemaker will cost...  That way, somebody gets a good deal on a nice dinghy, I get the experience to build a smaller version first, then I get to apply the aforementioned expertise to the second, larger boat, and I get my easily transportable pirate ship after all!  Kind of reminds me of that guy who started with a paper clip and kept uptrading (is that a word?) until he finally got a house...

NOTE:  By the way, the stick chair got a huge amount of attention at the move the other night!  I had people taking photos of it and asking me to show them how it folds up and testing it themselves...;)  I think that, much like childbirth, once I forget how painful it was, I'll make another one!


Friday, August 23, 2013

Stick Chair, Not Stickley Chair

So, after my second cup of coffee, I decided to give the chair assembly another go.  Even sober I assembled it wrong the first time and got bonked on the head a couple of times.  Trying to maintain my composure, I decided to try using some Amsteel I had lying around as an easier and more flexible version of the threaded rod.  This went much easier.  I was easily able to thread it and then cinch it up tight with a bowline and a couple of half hitches.


It's actually quite comfortable.  The damn intermediate pieces create a psuedo-curve that is easy on the back.  The way you bring the ends together torques the whole assembly into a surprisingly ergonomic seat.


All I need now is to bring home the acorn nuts and washers I bought (sigh...), and my hacksaw at work to lop off the extra all thread.  HINT:  When cutting any threaded rod, thread on a nut before you make the cut, then when you back off the nut, it dresses the threads up for you nicely so you don't have to fiddle with a file.  After the final hardware is installed, I'm going to give it a serious sanding to round off all those 90° corners.  Maybe I'll scribe some feet onto the legs, but nothing too fancy.  These will look awesome down at the beach!  I do have to admit that even though "Some Assembly Required" are my three favorite words, assembling this damn thing was one of the most frustrating experiences of my life...;)

Of course, never being satisfied with just following the plans, I started looking at the assembly with an engineer's perspective.  The plans called for 1.25" thick stock, but I used 1.5" 2x2's (don't ask), which meant my chair was 20% wider than it should be.  I started thinking about removing a stick or two, but then I realized that it would make the gathered ends too narrow for comfort.  The additional width actually makes the chair look almost like a love seat or at something a tad more substantial than your standard folding chair.  I like it.  I'll leave it, and I'm probably going to install a cup holder on the starboard side...;)  Now, I just have to decide if I'm taking it to the movies in the park Saturday night.  They're playing one of my all-time favorite movies - Princess Bride.  Now where did I put that t-shirt?

~~(\_~~


Sawdust & Glory...

So, yesterday I jumped into the shallow end of the woodworking gene pool.  The Mutineer desperately needs a new rudder.  As you can see from the pic below, it's seriously delaminated.  Also, one of the many previous owners used a regular steel bolt to keep it from kicking up instead of either a stainless one or rigging the uphaul/downhaul properly.

Can you say delamination?

I began by laying out the rudder, aligning the straight leading edge of the rudder against the factory edge of the plywood.  I "lucked out" in the fact that the plywood is about 1/8" thinner than the rudder.  Once I put the fiberglass and epoxy on both sides, it should be just about perfect.

I've even got enough plywood left over for another rudder!

Here it is all laid out.  Since I didn't remove the tiller/cheek plate assembly, I scribed a perfect half circle with the tape measure after finding the center point.

About to pass the point of no return...

 The orbital jig saw didn't come with blades, so I bought some fine toothed ones, but they had a different mounting style, so I had to resort to cutting curves with my circular saw.  I set the depth to just thicker than the plywood and ran the saw back and forth to plow out enough swing room to cut the curve.  Not the most ideal situation, especially since I've got an oversized circular saw for cutting deck posts from back in the day when I had a construction company.  Ready for the belt sander!

Maybe I'll make a longboard while I'm at it...

 So here's where I got to when the only belt I have for my belt sander broke.  It's really difficult to figure out everything you need on Friday night after work for the whole weekend on an island with only a grocery store that's really just a glorified vending machine.

Note the layers of plywood allow me to see the contours of the foil shape I'm going for.  Also, the thickest part of the rudder is supposed to be a third of the way along the chord from the leading edge, which is why the rudder is asymmetrical.  I've still got a lot of sanding to do, but when I'd gotten to this point on both sides, the leading and trailing edges were close the original rudder.  That means I'm almost there and will be ready for fiberglassing soon!


Would look cool just varnished...
I swept up all the sawdust right before my neighbor, with whom I share the driveway with, got home...;)

~~(\_~~

P.S.  Since I was already covered in sawdust (I love that!), I decided to tackle another project that I've been wanting to do for months, a Kentucky Stick Chair.  I found some plans online and bought some treated 2x2's the other night before heading home.  Along with some all thread rod and some acorn nuts and washers, I'm good to go.  Normally, I would setup stops and do this mass-production style, but I'm only making one chair, just to see if I like it.  The fact that it's made of wood and folds up like a kinetic sculpture is really cool.

Stock photo from plans
  
My fine cabinetry habits kicked in and instead of measuring each stick, I measured on and used it as a template for each successive stick.  The holes for the threaded rod were also done template style to make sure it all lines up perfectly.

Some assembly required...

Here, all the pieces are ready for assembly.  The threaded rod gets progressively harder to feed through the holes as you add more sticks.  I also discovered that you should install the two center rods first, since it has the most overlap, hence the most friction.  After at least three attempts, both on the driveway and the back of the pickup to save my back, I gave up.  Figuring out which holes line up with which for 25 sticks is not something that should be attempted after a six pack.  I gave up and headed for the showers, knowing when I'm defeated.  I may have lost the battle, but tomorrow, I'll win the war (even if it kills me).

Looks easy...
~~_/)~~

P.P.S.  What I've neglected to share is that all of this activity is actually just preparation for the real project at hand, a nesting/take apart Eastport Pram from Chesapeake Light Craft!  The Port Townsend Wooden Boat Festival is held every year for my birthday.  After years of drooling on floating pieces of art, I'm going to bite the bullet and buy some plans at the show.  I'm pretty jazzed about it.  I've already got some epoxy and hardener.  I'm planning on laying out the drawings on thin plywood, then cutting out templates to make two boats total.  At worst, I'll keep the second set of panels unassembled.  My dream is to someday host an event where kids build a dinghy with a parent or guardian over the course of a few months and then we have a big BBQ and sailboat race in the park where everyone gets to splash their boat.  Summer is a very precious commodity in the PNW!

Have you ever seen anything sexier than that?
Not to get too ahead of myself, but the way you make this a nesting dinghy is that at some point you cut your beautiful new boat in half!  There are two bulkheads that are above the waterline of the loaded boat, so theoretically, both halves float!  They even sell the compass rose inlay!  I'll definitely be looking for some boat show specials...;)

These are normally built out of very expensive marine grade plywood, but there's really nothing terribly different about it than normal, void free plywood once you've encapsulated it in epoxy and varnish.  1/4" oak plywood is very reasonably priced at the big box store and I can use dimensioned red oak lumber from there too to make the gunwales out of instead of expensive mahogany.  I'll save my quarter sawn white oak stash for making furniture.

~~(\_~~

So, today it's time to tackle that blasted chair assembly again.  Wish me luck.  I think I'll try to assemble it in the folded position so that each piece's orientation is more obvious.


Thursday, August 22, 2013

In The Beginning...


So, it's been a while since I've posted anything on a blog, mostly due to recovering from the sailing magazine incident that somehow landed me here in Bellingham, WA. Now that things have settled down, I thought I'd start posting my life and times again. A rolling stone gathers no moss... My first foray back into the true sailor's life was the purchase of a Chrysler Mutineer 15. It's already got the pirate built right into it...;)


Mine is what they affectionately refer to in the sailing world as a "project boat". Meaning it needs a lot of work to get it either working, pretty, or both. I have worked in the marine industry for 10 years and one of the truest axioms is "There's nothing more expensive than a cheap boat", meaning that you end up paying the difference in rigging, paint, epoxy, fiberglass, etc. At least you can put it on your own payment plan, though...;)

 So far, I've replaced the dodgy standing rigging with Amsteel. I'll post pics of that later. BTW, I live on Lummi Island and the boat is in the parking lot at work on the mainland, so I've been able to work on it for an hour or so after work, but then have to run to catch the ferry home.


 Today's project is to make a new rudder. The original one is sadly delaminated, so I bought some epoxy, fiberglass and a decent piece of plywood, which I will sand down into a proper foil shape. Not going to be a true NACA foil, but I've done enough foils in the past to get a decent approximation, plus I've got the original to work from.  The symmetrical layers of ply will help me get the contour lines even.

Some people ask me why I'm crazy enough to live out on Lummi Island.  It's a hassle, it's expensive, etc.  As a sailor, there's something very intriguing about taking a boat to and from work every day.  I'm have an island getaway every night after work.  It's very peaceful and the views are spectacular.  Here's a pic I shot just last night on my drive home.  You can see Mt. Baker and the Twin Sisters from just South of the ferry landing.  As a side note, I watched the owners of this nice little IOR sailboat grab the mooring ball while under sail.  NICE!  That's what I do when for fun and to impress my guests when I'm skippering a charter in the Caribbean.


P.S.  Part of my job description is running the rigging shop at a local chandlery.  On a daily basis, I do the same stuff, rope to chain splices, double braid, Amsteel, etc.  However, yesterday something new popped up.  A customer wanted a stop knot permanently installed at the end of his anchor rode.  To make this magic happen, I had to "invent" a splice.  The customer was delighted and so were some of my coworkers...;)  The anchor was 40# and looked like something out of Mad Max.  I definitely want that anchor on my boat when the Zombie Apocalypse happens...