Sunday, June 8, 2014

Eastport Pram Build: Does This Dinghy Make My Buttocks Look Big?

So, I went ahead and stitched the transoms on even though I'm not done cutting out the handles.  I just wanted something that looked like a boat instead of a pile of scrap lumber.  I'm really impressed with the precision in which the parts mated up.  The tolerances were so close, it looks like a CNC kit!

It's really cool the way the parts all force each other into the correct hull form!

Stitching planks #3 and #4 on really makes it look like a boat!
I'm pleasantly surprised how tubby she looks.
Lots of buoyancy for my 200 pounds!

She's got some nice lines.  Real boats have curves...

I couldn't resist adding the center bulkhead template
in to see how close it fits and the final hull shape.

I'm going to remove the transoms and finish the handle cutouts and ease the top edges while it's still easy to use the router on the workbench.

The next step is to precisely locate the center bulkhead and stitch it in place.  This stiffens the hull and holds it into the correct shape so I can flip her and fill all of the lap joints with thickened epoxy.  That will stiffen up the hull a bit to help her keep in shape...

Captain Skully out...

Sunday, June 1, 2014

Eastport Pram Build: I'm In Stitches and Totally Wired...

So after doing a ton of research by reading all of the other Eastport Pram and Passagemaker dinghy blogs out there, I decided to dive into doing the stitches.  Everybody discusses the stitching process from a big picture standpoint, but I wanted to go a bit more in depth here.  The directions clearly state to start at the bow.  Some advice on the CLCBoats.com forum was to start in the middle, but that could lead to both ends being off.  My concern about starting at the bow was that I'm doing this myself and that's a lot of unsupported plank just hanging out there.  I wondered if a string loop around the boat would hold the planks in place long enough for me to get the stitches in.  Lo and behold, it worked!

First course of planks stitched with the help of my loops...

Ah, but I'm getting ahead of myself...  Before the stitching comes the rabbet joint procedure.  Let me tell you that in all the years I've been doing woodworking, I've never done anything like put a 1/8" rabbet in a 1/4" sheet of plywood, especially on a curved surface.  Luckily, I had a router and the 3/8" rabbet bit, so no extra expenses there.  I clamped sections of the planks together on my workbench and routed the stretches between the clamps.  Move clamps and continue on.  I made sure to mark my templates to ensure I rabbet the correct edges because the first two planks are concave and it's a bit non-intuitive.

Rabbet joint close to it's final position.  You can see the shoulder it creates to positively locate the planks.  Also, you can see the triangular void that will be filled with thickened epoxy to support the thin plywood edge and help attach the planks together.

Before I got to the actual stitching part though, I had to drill the holes.  I wanted to ensure that they matched up along the curve.  The directions say every 4", so I made a gauge stick.  One inch wide, so that each half would be the appropriate 1/2" inset for drilling the holes, with two 1/16" holes exactly 4" apart.  One hole I fed a short piece of wire through.  The wire goes into the previously drilled hole in the boat part, positively locating the hole to be drilled.  I then just worked my way along the edge of the first plank.  I then held the plank in place (with the help of my string loops) and made a mark on the bottom that corresponded exactly to the first hole on plank #1 with the bow edge perfectly aligned.  I then stitched the first hole.  This helped me keep the alignment so I could make the corresponding marks along the bottom using the previously drilled holes in the plank as a guide.  BTW, the holes are located about 1/8" from the end of the rabbet (3/8" rabbet + 1/8" gap = hole 1/2" from edge), so it looks a bit fragile.  I had no problems however, as long as you keep the planks wrangled.  Once you get about half way down, the rest of the plank is sufficiently supported.  Oh, BTW, I also used a back block when drilling all of the holes to eliminate tear out on the back side.  I might have forgotten to do that as a pretty standard woodworking technique, regardless of it being a 1/16" hole had I not read it in one of the blogs.

Difficult to see but the wire poking out the back left goes into the previously drilled hole.

OK, so now back to the stitching...  It was a bit scary and tricky.  I found that if I bent the wire into a lopsided staple, then I could put the long side into the plank that's at a bit of an angle, slide it in a bit to get it started, then put the short side into the bottom and slide them both through.  Then I smash the bend in the staple flat across the seam with my finger to take out some of the slack (making sure not to crush the rabbeted edge that's sitting on the sawhorse), then duck under the boat.  I make sure the legs are bent sort of parallel with the boat bottom, then twist so that both legs are wrapping around each other equally, kind of like a DNA double helix.  You don't want one just corkscrewing around the other.  Twist placement is also important.  I wanted the crotch of the twist to be right on the edge of the rabbet so that the crotch sits naturally on the corner of the plywood.  This also draws the joint together very efficiently.

I was also concerned that the stainless steel wire that I can get for cheap at work would be too stiff and/or sharp for the 1/16" holes and the 1/4" plywood, with the 1/8" rabbet.  So far, so good.  I left the stitches a little loose on purpose and I figure I can always tighten them up as needed.


Second course stitched, ready for the transoms!

According to the manual, after the second course is stitched, it's time to attach the transoms.  I'm experiencing a slight delay here however because my supposedly 9mm transoms are actually two 6mm plies cut out at the same time with the template.  That means I have to laminate them together perfectly.  I've got one screw through all of the layers where the handle cutouts are.  That should help.  After the glue-up, then I've got to cut out the handles and route the edges.  I figure this will be a lot easier while I can clamp it to the bench than when it's part of the boat.

Starting to form a boat shape!

So here's where I have to make a confession...  After getting planks #1 and #2 stitched on, I held the transoms and bulkheads in place and they didn't line up.  I thought I had installed the planks backwards, bow to stern!  After checking the plans, and some monkeying with the curvature of the hull, I managed to get the boat within striking distance of the stern bulkhead.  WHEW!  At that point, I clearly labeled my templates and will put masking tape on the oak for future reference.


Not bad looking for $27 oak plywood...
Captain Skully out...

Sunday, May 25, 2014

Eastport Pram Build: I'm Getting a Little Dinghy...

So, you may remember that I always try to go to the Port Townsend Wooden Boat Festival every year for my birthday.  Shortly after that, I bought the plans for Chesapeake Light Craft's Eastport Pram.  I decided to go with the non-nesting version because it was sexier.  Well, I went against the grain (pun intended) and bought some 1/4" oak plywood from Home Depot.  I've been going there almost every day anyway to build my new store, so I thought what the heck.  It's less than a third of the price of Okoume from Eden Saw.  Although not quite as pretty, it will still make a gorgeous pram.  There's the debate about marine grade, waterproof glues and all that, but I'm going to encapsulate it in epoxy anyway, so I figure for the price if it gets waterlogged after a while, I'm still ahead of the game.  Also, I'm cutting out a version in 1/4" masonite to act as a router template for a possible future second boat.  Although I do love lofting, drafting and laying it all out, anything I can do to reduce build time on a second boat is highly desirable.  I figure I've got about 16 hours into the boat thus far and I don't even have all the pieces cut out yet.  I'm focusing on cutting out the parts that get stitched together in the proper order according to the instruction manual that came with the plans.  So, first the bottom, then the side planks, then the transoms, then the bulkheads, then all of the rest of the thwarts, etc.

I had a hell of a time cutting out plank #1 with a sabre saw/jigsaw.  It walked and wandered so much that I had to spend an hour sanding it back to the line.  That's when I thought about using my japanese pull saw.  It worked like a charm.  It has a narrow kerf and allows me to make modest curves that are perfect for the planks.  Cutting through the masonite and the 1/4" oak plywood at the same time so that the template for a second boat and the original boat are exactly the same.

Cutting the curves the smart way...

I probably need to mention here that the plans call for 6mm and 9mm okoume for the hull and transoms.  Since I'm stuck with 1/4", which is nominally 6mm, I can only double up on my plywood to make the transoms, which will be 12mm instead of 9mm.  I'm OK with the additional strength, as long as the extra thickness doesn't create a problem putting the boat together.  I am a little concerned about the additional weight.  The stock Eastport Pram is supposed to weigh 65 pounds and since I'm doubling up on several parts of the boat (1.5x actually), I'll probably be noticeably heavier.  I plan on addressing this with wheels on the keel so that I can roll it down to Greenlake beach and launch.  It's about 2 blocks away, across a weird 5-way intersection (typical of Seattle), so I'll probably get some looks.

"Bad" side of bottom.  The oak veneer is actually really sexy...

Planks all cut out - two mated sides, good-side to good-side, so bad side is showing, plus template...

Bow transom:  two-ply of 1/4"=12mm instead of 9mm plus masonite template...


I did a test pass with the 3/8" rabbeting bit in the router on some scrap plywood.  The thinned edge slips into the gap between the bearing and the bit, so I quickly realized that two planks need to be ganged up to allow the bearing to ride on an edge safely.  I'm planning on painting the exterior of the hull, but the interior will be finished bright with epoxy resin and varnish.  Because of this, it's important that the "good" side of the plywood gets the rabbet, so that it overlaps properly when stitched together.  I've left the screws holding the layers together as much as possible to facilitate alignment.  It looks like I'll need to make a router template for the bow, stern and keel handle cutouts.

So, next up is cutting the rabbets on at least plank #1 so I can get some practice stitching the plank to the bottom.  I'm using stainless steel seizing wire instead of copper, so I shouldn't have any breakage issues.  Another challenge will be to glue the bad sides together (showing in the above pic) and making sure they become one while staying perfectly aligned.  I may have to build a quick and dirty jig for that, but it shouldn't be too tough.  I also thought about vacuum bagging them, but that makes it impossible to keep the alignment perfect.

So far, I'm at 5 sheets of 1/4" oak plywood at $27 each plus 2 sheets of 1/4" masonite at $13 each.  I've already got the epoxy, so that's covered.  I was perusing the Pettit Easypoxy for the hull and it says that one quart covers 600 square feet and quarts are only $18-$38, depending on the color.

Captain Skully out...

Saturday, October 12, 2013

Life In Plastic, It's Fantastic - Hardening a Foam Iron Man Costume...

So, busy week here in the treehouse!  I bit the bullet and articulated the armor.  The shoulder was a bit tricky because of all the parts involved and the degrees of freedom required.  I think I found a decent compromise, considering there's only one buckled strap per joint.


The knee has been hanging over my head, so to speak.  I tackled it by using the buckles themselves to provide the freedom.  I tried it on and there's plenty of movement, just not a lot to pull the knee back into perfect alignment.  I think I'll be able to live with that.


I bought some flexible, sandable caulk at work and smoothed the rather ugly intersection between the forearm and the wrist.  It took a few days to cure, but I took it outside and sanded the transition pretty smooth with 150 grit.  I was worried that the Styrospray wouldn't take to the caulk, but it evidently worked out OK.


Since I've already got $300 and 300 man hours into this project, I decided to go all the way and use Styrospray 1000 to harden the foam armor.  It's a two-part polymer that cures with the moisture in the air.  Finally, living in the PNW pays off!  It's a 1:1 mix ratio, so even I can do it.  The fumes weren't too bad, kind of like freshly painted walls.  I've got two coats on about 40% of the armor and it makes a HUGE difference!  I'll do a sanding and then apply a third coat.  So far, I've used about 20% of my kit, so I should have some left over after I do three coats on the whole suit.  I can definitely see another costume in the very near future, once I recover from this one.


The Styrospray over the BoatLife Life Caulk actually looks like welded metal!


For some weird reason, the Styrospray on the red foam parts bubbled up a lot more than the white foam parts.  Sigh...  Of course the tradeoff is that it's much easier to see where you've already painted the off-white Styrospray on the red parts than the white.  Sigh...


The hardening of the armor is substantial!  The third coat should make this feel much more like toy plastic than costume flimsy plastic, if that makes any sense.  The styrospray is very glossy, in fact it still looks wet.

NOTE!  I didn't use gloves because I needed the manual dexterity to hold the parts while painting them.  Spraying would definitely be preferable.  I have basically plasticized my hands and it's extremely tough to get off.  Also, building a PVC drip drying rack is much better than letting them sit on a plastic drop cloth to cure.  Where the Styrospray contacts the plastic, you get "flash".


Based on XRobots.co.uk videos, I cast my hands in order to be able to sculpt the gloves perfectly.  Of course the $22 sculpt didn't turn out perfectly, but it will most likely be better than some sloppy foam construct.  A couple of fingers broke off in the demolding process.  I'm going to use Sculpey clay and then oven bake it to save from having to make molds.  I'll let you know how that turns out.


Here's the helmet after 2 coats.  While not DOT approved, it certainly is a lot more rigid than just the foam.  Sanding and at least one more coat, then I have to decide whether to cut the faceplate off and build the swingarm mechanism.

Captain Skully Out...

Saturday, September 28, 2013

Suit Up!

So, I spent another lovely day in the PNW listening to the whitewater gushing out of my gutters.  I love the smell of hot glue gun in the morning...;)  Here's where I'm at as of today:


I think it's starting to look pretty good...;)


I was able to connect/articulate the biceps to the back so that it can be put on like a long sleeve shirt, barely.  The thighs are also suspended from the codpiece.  They work pretty well, considering they're only attached at one point by 1" webbing.  They're all quick-release buckles, so it can be taken apart to be painted.  The problem with having a single point of articulation is that there's going to be a trade-off somewhere.  The range of motion is pretty good, given the limitations.


Decent articulation...


I also installed the speaker mounting bracket inside the chest and I will also build an iPhone pocket in there.  Plenty of room.  Note to self:  do more pushups!

The shoulder bells will be installed next.  I figured out away to hang them so that they overlap and flop correctly.  I'm going to create a slot in the back piece for the webbing to come through.  That way, the webbing can be anchored with hot glue on the inside and the shoulder bell will cover the slot.


Now that's a selfie!


The shoulder bells really make the whole costume.  I can't wait to get them installed.  The shins are going to be problematic.  I don't know how to articulate the knee.  It's the most problematic joint in nature for a reason.  It has to be strong and flexible.  I hope to get the shoulders done tonight.  Wish me luck!

Captain Skully out...

Friday, September 27, 2013

Iron Man II

So, I setup several inspirational reminders on my phone, and the 1 month until ComiCon went off last week!  I'm still really struggling between PlastiDip and StyroSpray finishes.  I only have one shot and I want to do this right.  If I use something that's truly hard, I'll be able to sand and fair the seam lines into a much better contour.


Two heads are better than one...


I dove back into the helmet pattern.  The first thing they tell you on the forum is don't make the helmet first.  Your foamy skills will drastically improve while you build the rest of the suit.  But did I listen?  They were right.  I'm happy to say it because it's incontrovertible proof as to how much you improve.  As you can see the second helmet is much less torqued and also happens to fit with enough room for the faceplate lifting mechanism (stay tuned).  Ironically, you have to glue the whole thing together first so that all the parts are supported and are the correct shape while you apply your stiffener of choice, then you have to cut the faceplate away so that it's rigid and fits the helmet perfectly.  Note, I also used contrasting foam colors for dramatic effect...;)  The original helmet was done using the heat gun/form it over your knee technique that some members on the forum are able to so quite successfully.  I, however, am not.  I liked the lack of seams, but didn't like the randomness of the curve.  I guess I was a phrenologist in a former life...;)


After an acceptable level of success with the helmet, I tackled the mind bending glove pattern (see below).  Titled "easy" version on the forum, I was emboldened to give it a shot.  HA!  The pattern only looks like a glove after it's completely assembled.  Along the way, it's a 3D Rorschach test.  I used thin foam to build the practice glove (2mm?) and had to use all of the pics of the finished glove on the forum to put it together like so.


TA DAAA!  Ugh...

As I said, you can only see how it's supposed to look after it's all put together, so I had to glue the parts where I thought they should go.  I was close.  As you can see, I made several notes on the glove about where things really ought to go.  I've also got a better idea as to where I should use the 6mm foam to beef things up and for the 12V LED repulsor housing.  It's nice to work in a marine store...;)  


Easy Peasy...

I'm going to blow up the pattern by 5% and give it another go.  Some folks use Velcro and some use rare earth magnets to hold the gloves together.  It may be dependent on whether they leave their gloves foamy soft or harden them.


 I've also made a few boots, some out of card stock paper and at least one foam version.  I'm trying to find the right size to fit over some cheap Crocs ripoff shoes at the local discount store so I can permanently glue the boots to the shoes and hope to be able to have some semblance of mobility.  I find it rather funny that when I'm goofing around and do my "Iron Man" walk it's actually a "RoboCop" walk.  I guess I'll have to work on my strutting.  Once again, even at this stage in the game, the second boot came out better than the first one...


Das Boot!

So now I'm down to some of the gory details.  I've got to get the gloves ironed out, then all the damn finger pieces.  BTW, one of the tutorials suggests you hot glue gun the parts to a glove while you're wearing it and warns that it's going to be hot!  Actually, that is the best way to get everything to fit correctly.  Sigh...  Luckily, as a rigger, I'm pretty immune to hot stuff...:-\  Don't try this at home, kids!


My favorite hyperbolic paraboloid...;)

So, last summer, and planning ahead as always, I saw that Pringles was giving away MP3 speakers that fit into the empty can if you sent in an obscene amount of Proofs of Purchase.  Loving Pringles and thinking it would be a great gadget for the Iron Man costume, I plowed through several cans, which I think made my suit a bit tighter.  Finally it came in the mail, and like Ralphie in Christmas Story, I raced into the house to open it up.  Low and behold, it was even Iron Man red!  How's that for a sign?  Anyway, it's pretty cool cranking out a certain Black Sabbath tune from inside the chest piece!!!  These are the kind of touches I'm hoping will help me win some contest ca$h...;)


Strap on!

Oh, I forgot that I'm also assembling all of the parts to make the suit wearable, keeping in mind that some articulation will be required for me to freely move about the cabin.  Here's a shot from inside the chest/abs assembly of how I positively locate the two parts so there are no gaps, the parts don't interfere with each other and the two pieces can move independently.  Hot gluing 1" webbing and making it easy to disassemble with Delrin clips.

Today, I'm hanging the legs off the codpiece, which is permanently attached to the abs.  Any articulation between those two pieces is problematic because the edges interfere, so I locked them in place, which surprisingly doesn't limit my movement because there's so much room between the codpiece and the thighs.  NOTE:  When shimmying into your costume in your skivvies, make sure to lower the blinds so your neighbors don't think you're a freak!


Friday, September 13, 2013

Port Townsend Wooden Boat Festival!

This year's logo from poster on ferry.  Have to get a t-shirt!


So, I've been planning on going to the Port Townsend Wooden since I left PT last year...;)  As a sailor and a woodworker, it's Disneyland for me.  It also happens to fall very close to my birthday every year, which is kind of cool.  An added bonus is my newfound passion for building a wooden boat.  As you know, I've been looking seriously into building CLC's Eastport Pram and they're an exhibitor every year!  Being able to see one built in real life with the new eyes I have from doing all of my research proved invaluable.

Why I go every year...

After drooling my way through the awesome chandlery at the entrance to the festival, I slowly made my way past Brion Toss' rig shop and other holy ground to the CLC "booth".  I say booth in the loosest terms possible.  They own a whole corner of the grounds.  Their boats and kayaks are everywhere.  The brightwork is dazzling.  Anyway, right there was the Eastport Pram, nesting version with sail kit, all setup, along with the Passagemaker take apart dinghy!

What all the fuss is about...;)


Seeing both together, I vacillated between them.  Then a couple of things clicked.  I could build the small one for practice to get better at the techniques so the large one would turn out better.  I could build the small one and sell it to pay for the materials to build the large one.  I think the most compelling argument as a novice boat builder is that the small one doesn't require a scarf joint, meaning I can make it out of one sheet of plywood.  It's easier to move with my back acting up, and because there's no scarf joint, I could theoretically not have to paint it and leave it bright...;)  Also, the large one would probably cost three times the price to build of the small one, which is a factor right now for this particular hobby.

Passagemaker in back, stern of Eastport Pram in front...

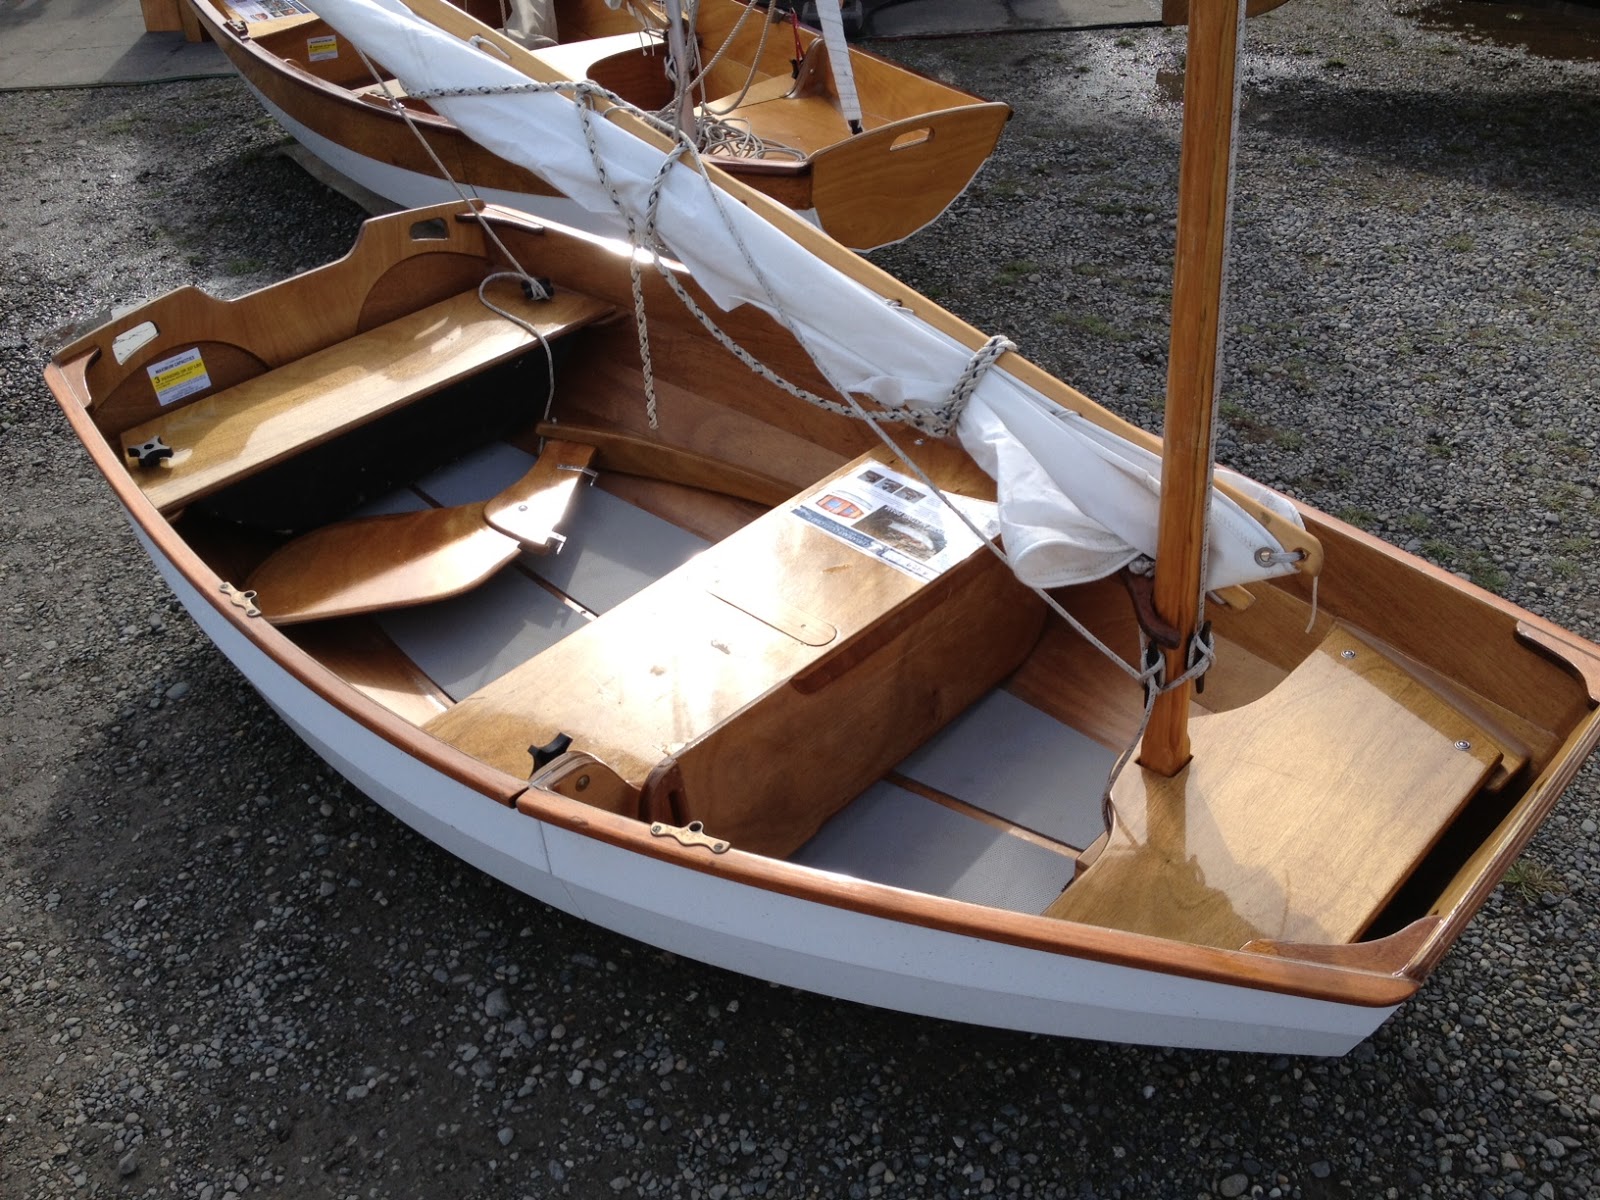
Upon further inspection of the nesting version of the Eastport Pram, I had a couple of observations...  First, there are a lot of aesthetic tradeoffs to make this thing nest.  The stern thwart that you see in the photo above must be removed in order for the bow to fit, hence the knobs (the line from the boom is tied to one).  I had planned on making that removable if I don't make it a sealed buoyancy tank.  Second, the "curvilicoius" center thwart isn't "curvilicious" on the nesting version because the curves don't fit when nested.  Sigh...  So now I'm torn between building the nesting version for ease of transport or making the much prettier one-piece version (see photo from previous post).  At approximately 75 pounds, maybe I can swing it (literally).

I talked with one of the guys working the booth, and the cost of the plans at the show was $9 less than online, without the additional $9 shipping.  I decided to hold off on buying plans until I metabolized my conundrum.  I then thought about building one of the cheaper or free boats from www.Bateau.com, but they don't have the same lines.  I don't want something that looks like a couple of plywood planks epoxied together, I want something graceful, so I think I'll wait until the Lummi Island dry-dock season is over and start bringing some 4' x 8' sheets of 1/4" oak plywood home.  My landlady is a totally cool lady from Alaska with tons of boating experience, so she's offered me a place to setup shop to build.

Happy as a clam in a pram...;)

I will say that an 8 foot boat for a 6' 2", 200#  guy is a bit of a stretch, but I think it's doable for a daysail.  I've also done some research on trolling motors.  Evidently, the only real difference between a fresh water and salt water versions is about $200 and some metallurgy that can be addressed by hosing the motor off when you get back.  I am very serious about the possibility of building two prams or at least using the parts for the first one as templates for another one to save lofting again in the future.  One option is Tyvek templates, but I don't want to risk the flexibility factor.  I also don't need to haul around another 75 pounds worth of templates for the foreseeable future.  Sigh...   All of these mutually exclusive criteria...  The good news is that I found some adjustable bars for my pickup that would allow me to stow the pram upside down over my bed/cab (much like those cargo photon torpedo capsules you see on top of Subarus), and they're only $50!

I've looked at building an Optimist or a Pelican, but those boats require you to build a jig, which the boat is then build onto, then when done, you cut your boat free from the jig.  While this is attractive in a classic boat building sort of way, I'd rather spend my time building the boat than the jig, and possible two boats in succession to have a fleet to race against...;)  CLC's stitch and glue method means that once the boat parts are cut out (or delivered if you order the kit), then the boat basically gets stitched together in one day, with the bulk of the work epoxying what you've put together.  I'm banking on building two is only 50% more hassle than building one, but I'll be happy with one for now.

Keep in mind that one of the goals of this project is to put together an event where people build these at home and then we all hit the lake together for a big BBQ.  The only way I can pull this off with any kind of credibility is if I've already built one to show off.  I think it makes a great centerpiece...;)